How to Sell Tickets with Stripe (With No Third Party Tools)
There's a secret that the big ticketing platforms don't want you to know...
Would you like to avoid the huge fees ticket platforms charge?
Does the idea of paying 'big corp' (Eventbrite) huge sums keep you awake at night?
Well it turns out that it's actually possible to sell tickets to your events directly with Stripe - cutting out the middleman. It's probably the cheapest method available today to sell your event tickets online. I'm serious - I challenge you to find a way of selling tickets cheaper than this.
I'll show you a quick example so you can see how stark this difference is. I'll pretend you're selling 100 tickets at £20.00 each.
In the UK, Eventbrite would charge you a £19 per month service fee plus 6.95% + £0.59 per sold ticket. Based on some quick math on the back of my notepad, Eventbrite is going to charge you £217 to sell these tickets.
Let me repeat that. £217 to sell £2,000 worth of tickets. Over 10% of your revenue. Insanity.
An Eventbrite (and the other ticketing platforms) alternative.
Stripe, our knight in shining armour, rides in from the distance and only charges only 1.5% + 20p. This works out to about £50.
£50. That's it. Would you rather pay £50 or over four times more to Eventbrite?
Ok, I'll stop picking on Eventbrite now, as they are one of the worst offenders, but you get my point.
Stripe is a dirt-cheap way of selling tickets. But why is this? There's rarely a free lunch when it comes to selling things on the internet.
Why is Stripe the cheapest way to sell event tickets?
Stripe is a 'payment platform'. Their main job is to enable payments on the internet and most ticketing platforms actually use something like Stripe in the background.
So in a way the 'ticketing platforms' add on fees and act like a middleman between you and the payment provider. This is necessary because they give you all the features that you need to actually sell tickets. And having access to a payment provider on its own isn't usually much use.
Introducing Stripe Checkout
What's interesting about Stripe is that they provide some basic tools called Stripe Checkout. And Stripe Checkout allows you to sell tickets using their platform directly. No 'middleman' at all. Sweet!
So what's the catch? Yes, there's always a catch...
Stripe Checkout is somewhat basic. It's doesn't provide you with all the bells and whistles that a specialised ticketing platform does. But. If you're willing to deal with this, or your needs are in-fact, basic, then you can save a bag of cash.
How to sell event tickets with Stripe Checkout.
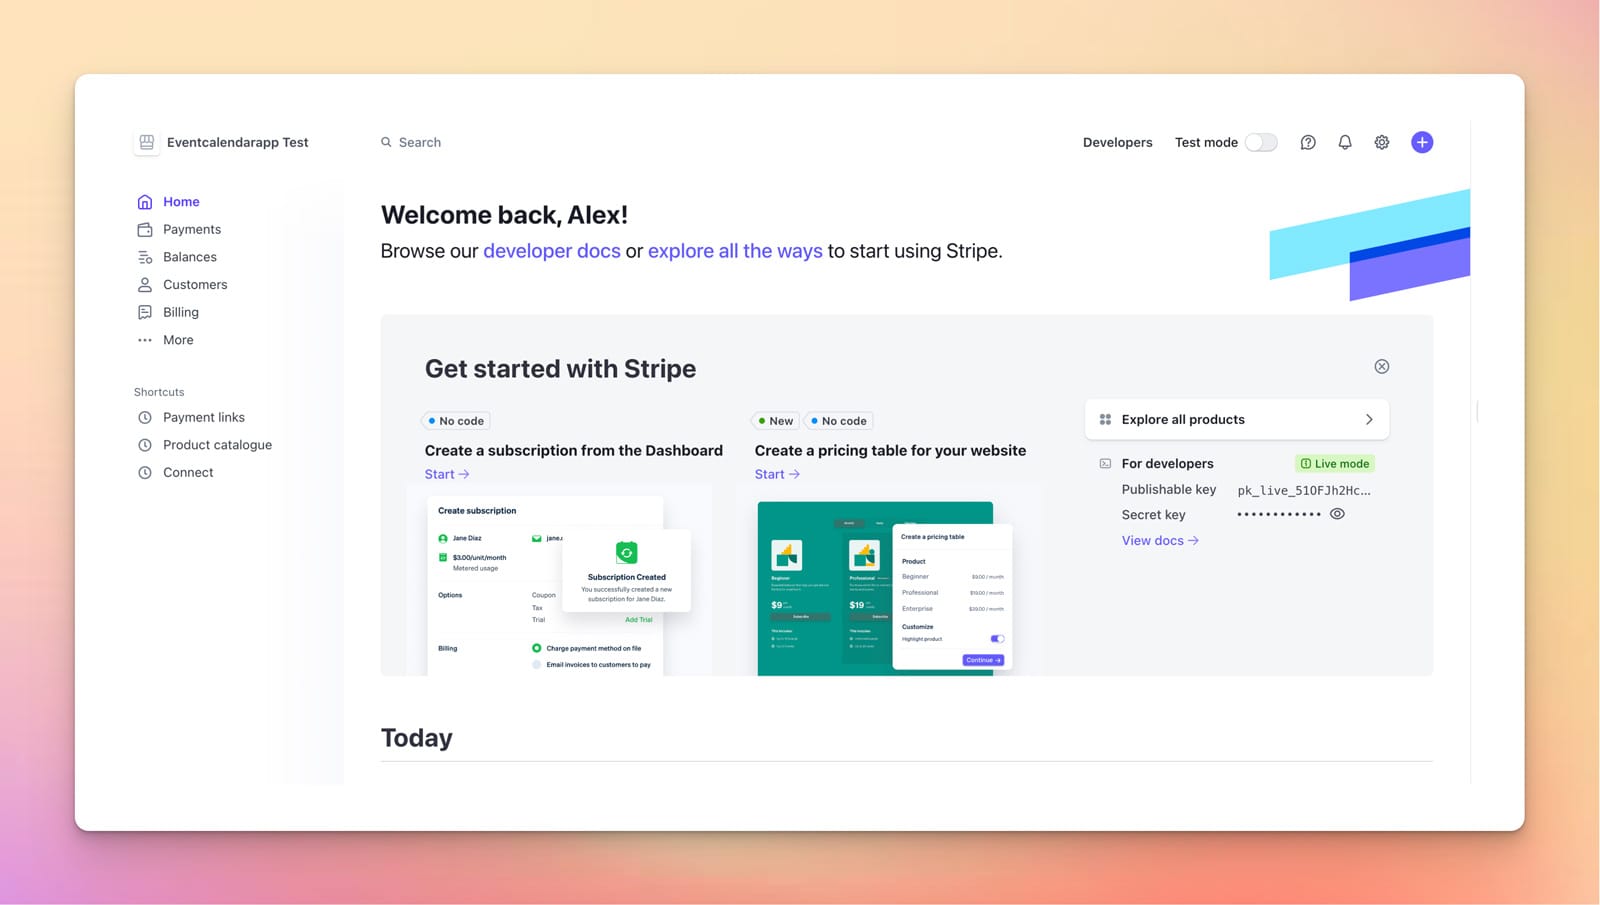
Head to Stripe and setup an account, if you don't have one already.
Stripe has a fairly vigorous onboarding process. But when you're in you should see a dashboard that looks something like this:
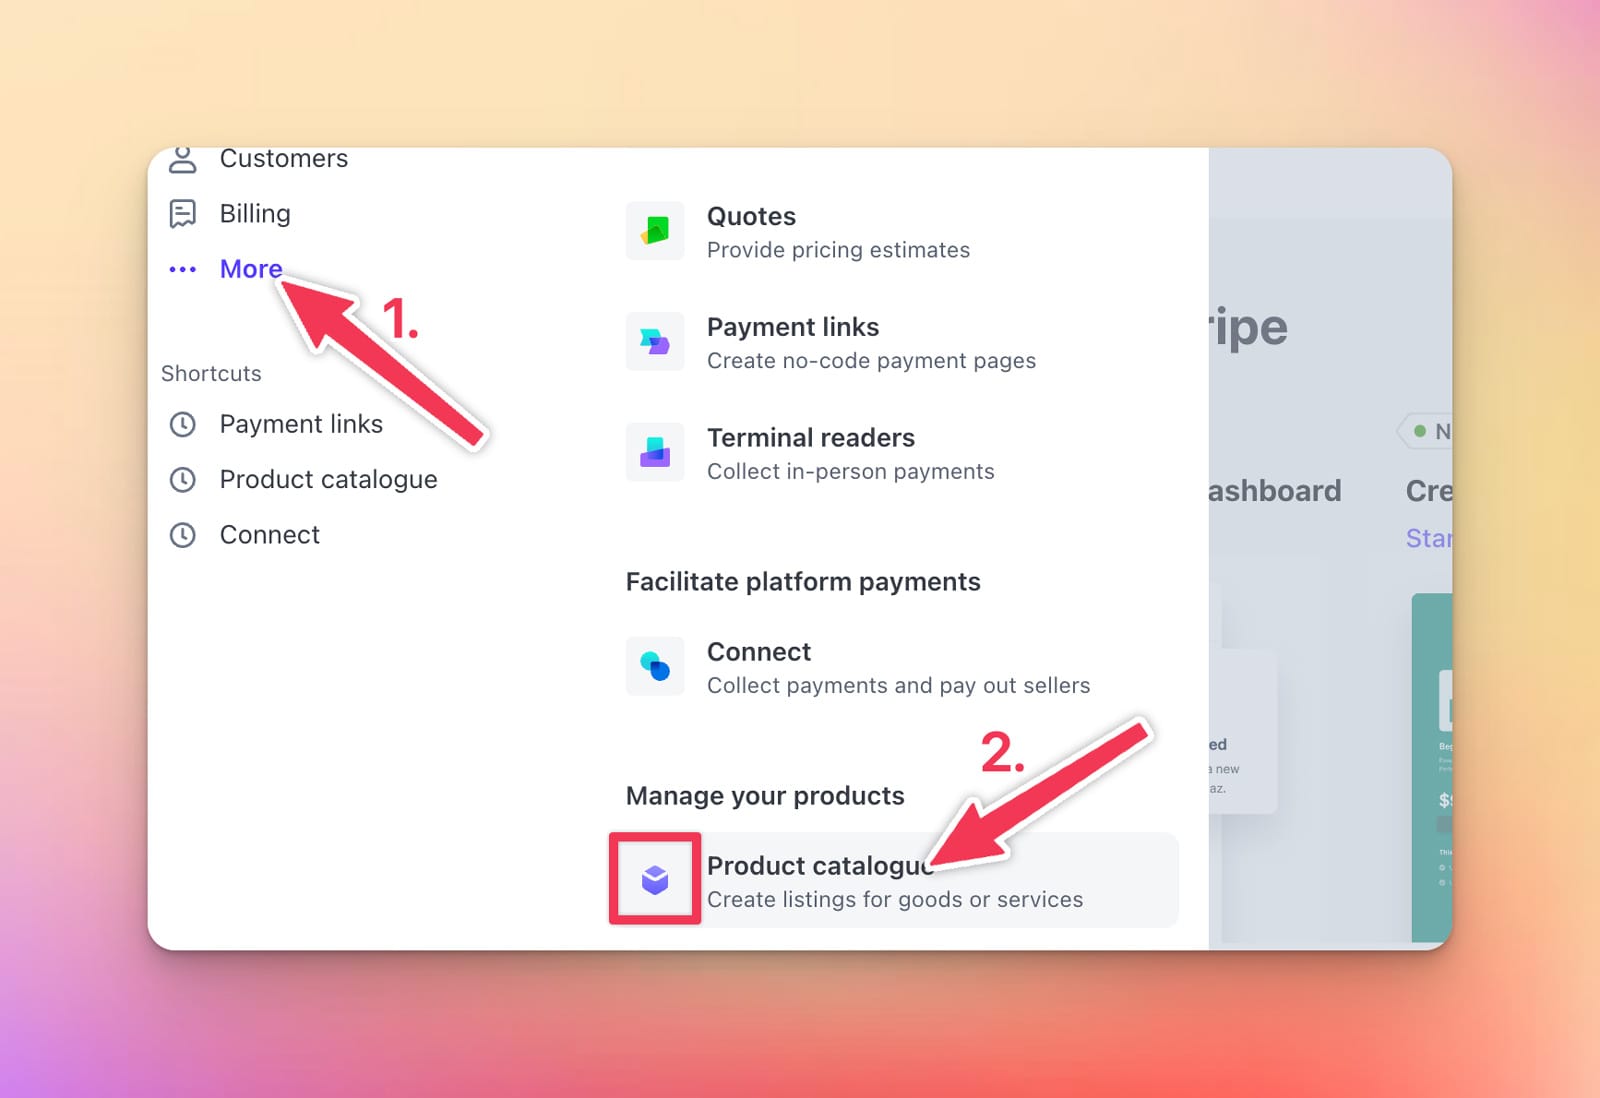
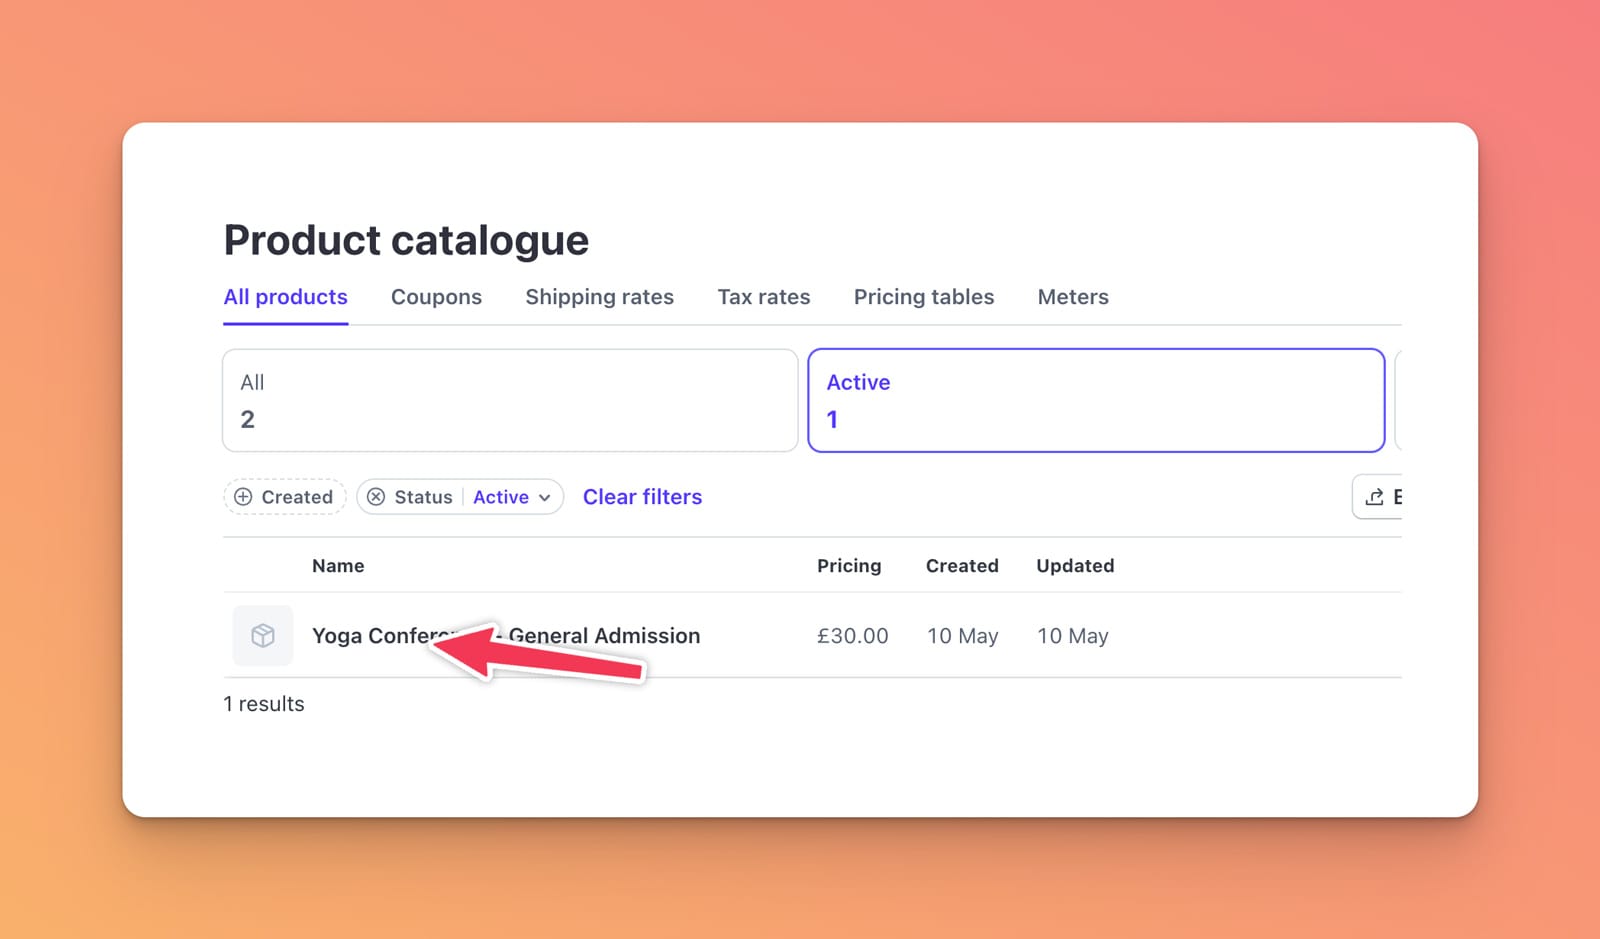
The next thing to do is create a 'product'. This will be the tickets that we sell. Click on 'More' on the left and then 'Product catalogue'.
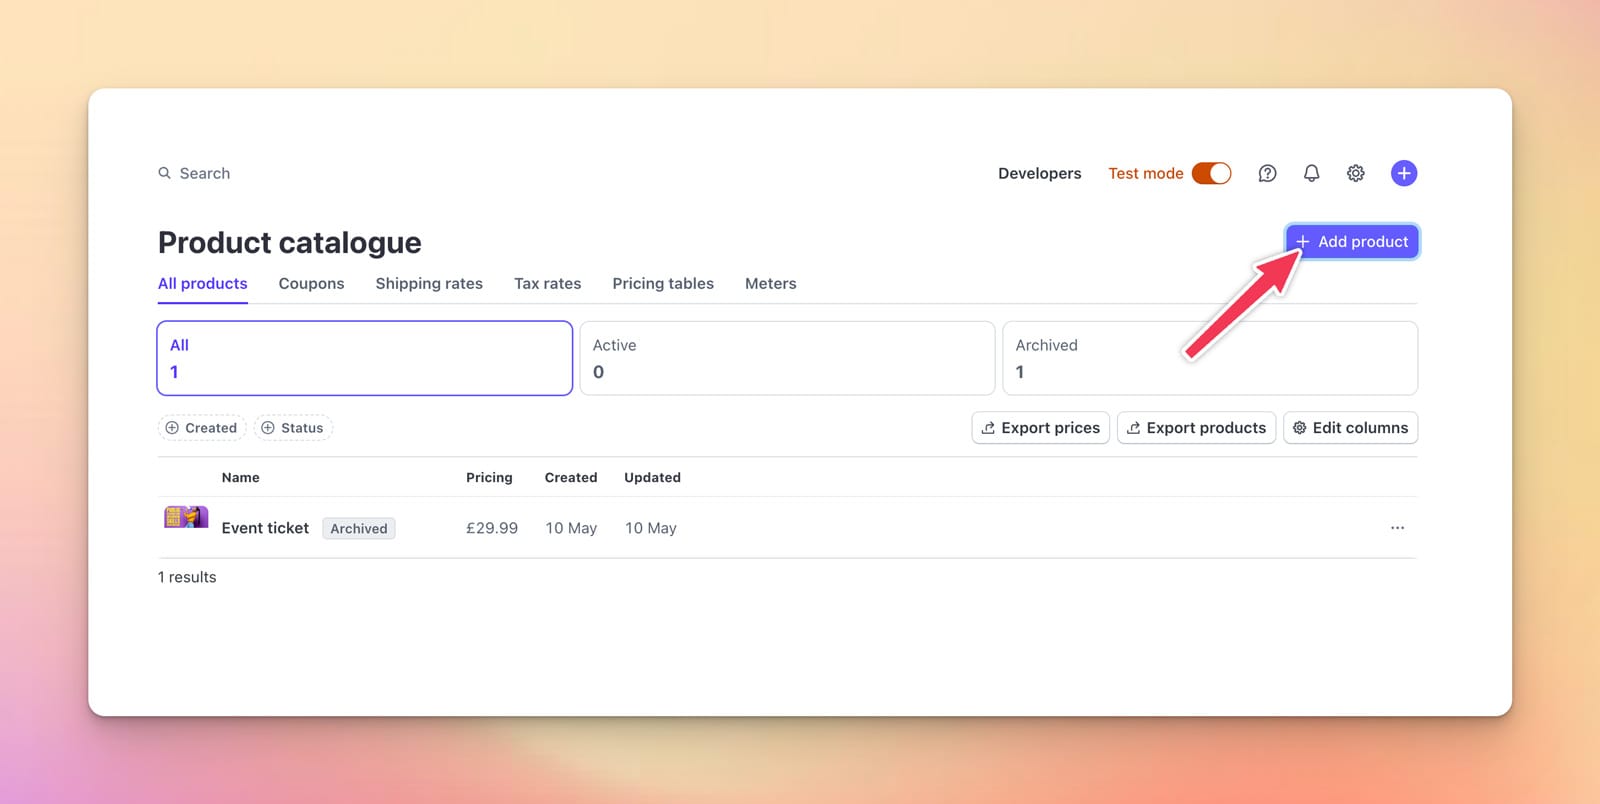
This will take us to the Product catalogue page. Once you're on this page click 'Add product'.
You should then see the 'Add a product' modal.
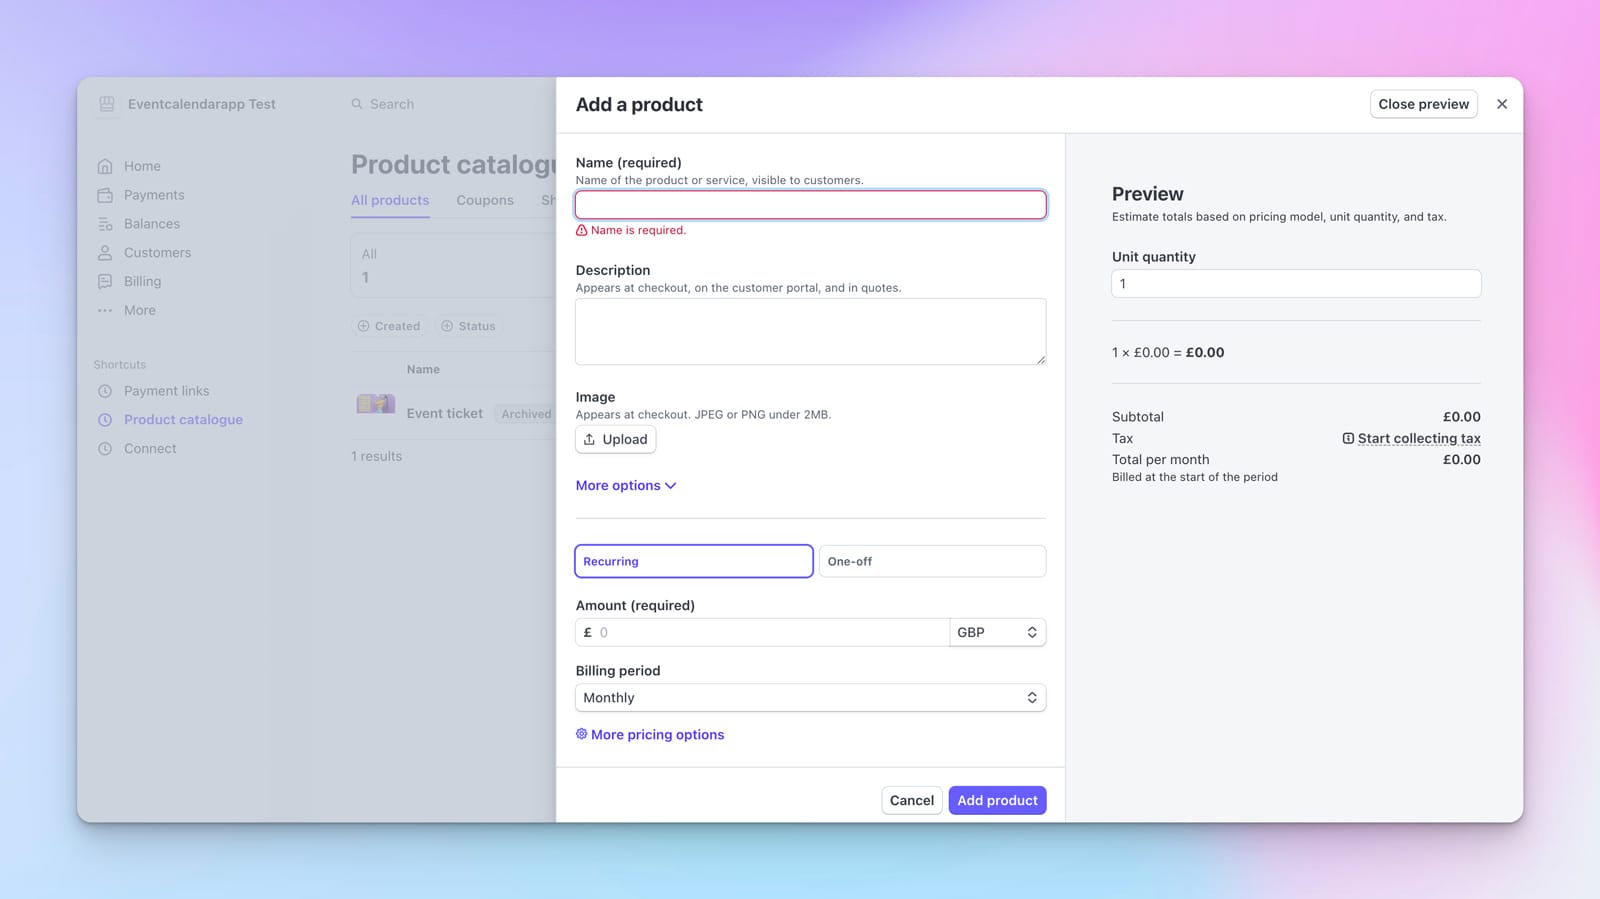
There's a bunch of different options here. Here's the main things we care about for tickets:
- The name of the product should be the name of the event plus the ticket type. Something like this works well 'Your Business Conf - General Admission'. That makes it super clear for the customer what they'll be buying.
- Add an image. It's a simple way of making the checkout page look 10x better for your customer. It makes the checkout page look more 'trustworthy' and increases conversion.
- Change the type from recurring -> one-off. This is super important. Otherwise you're going to be accidentally creating monthly subscriptions which you don't want.
I know what you might be thinking here. What to do if I want to sell different tickets types? There's not a solution for this directly in Stripe, but more on this later...
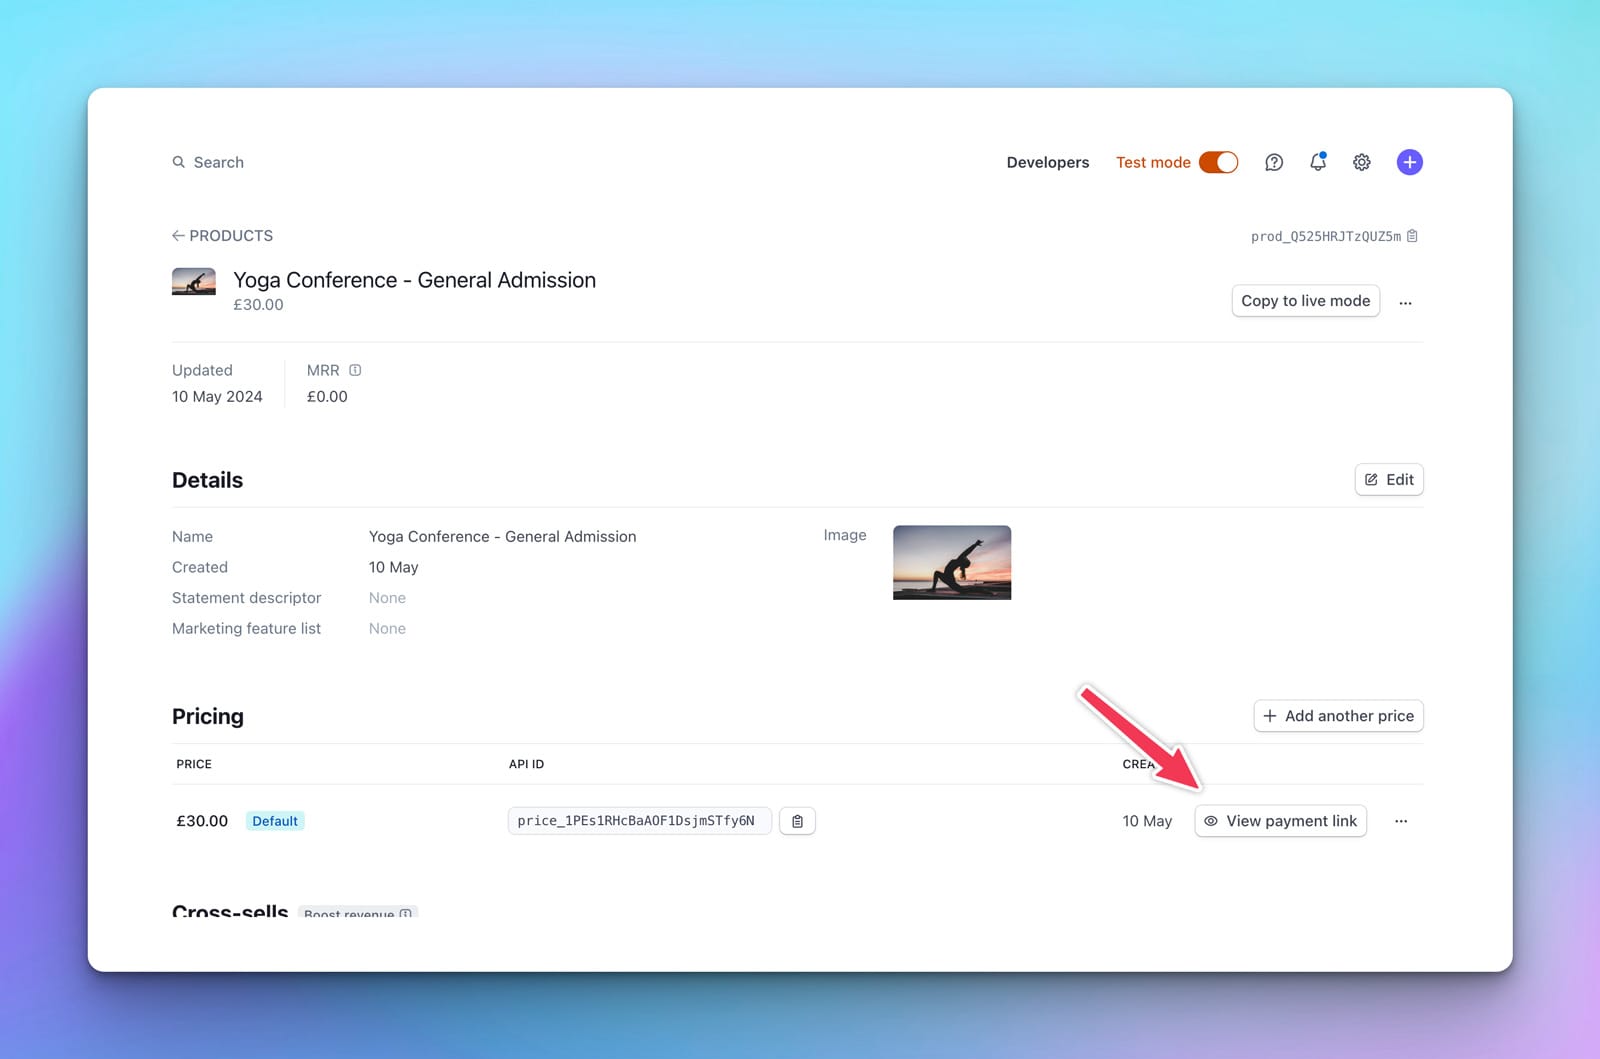
Once you've created the product, click on it on the dashboard. This will take you to the product page.
Once you're on the product page, look for the 'Create payment link'. This is going to create the magic we're looking for!
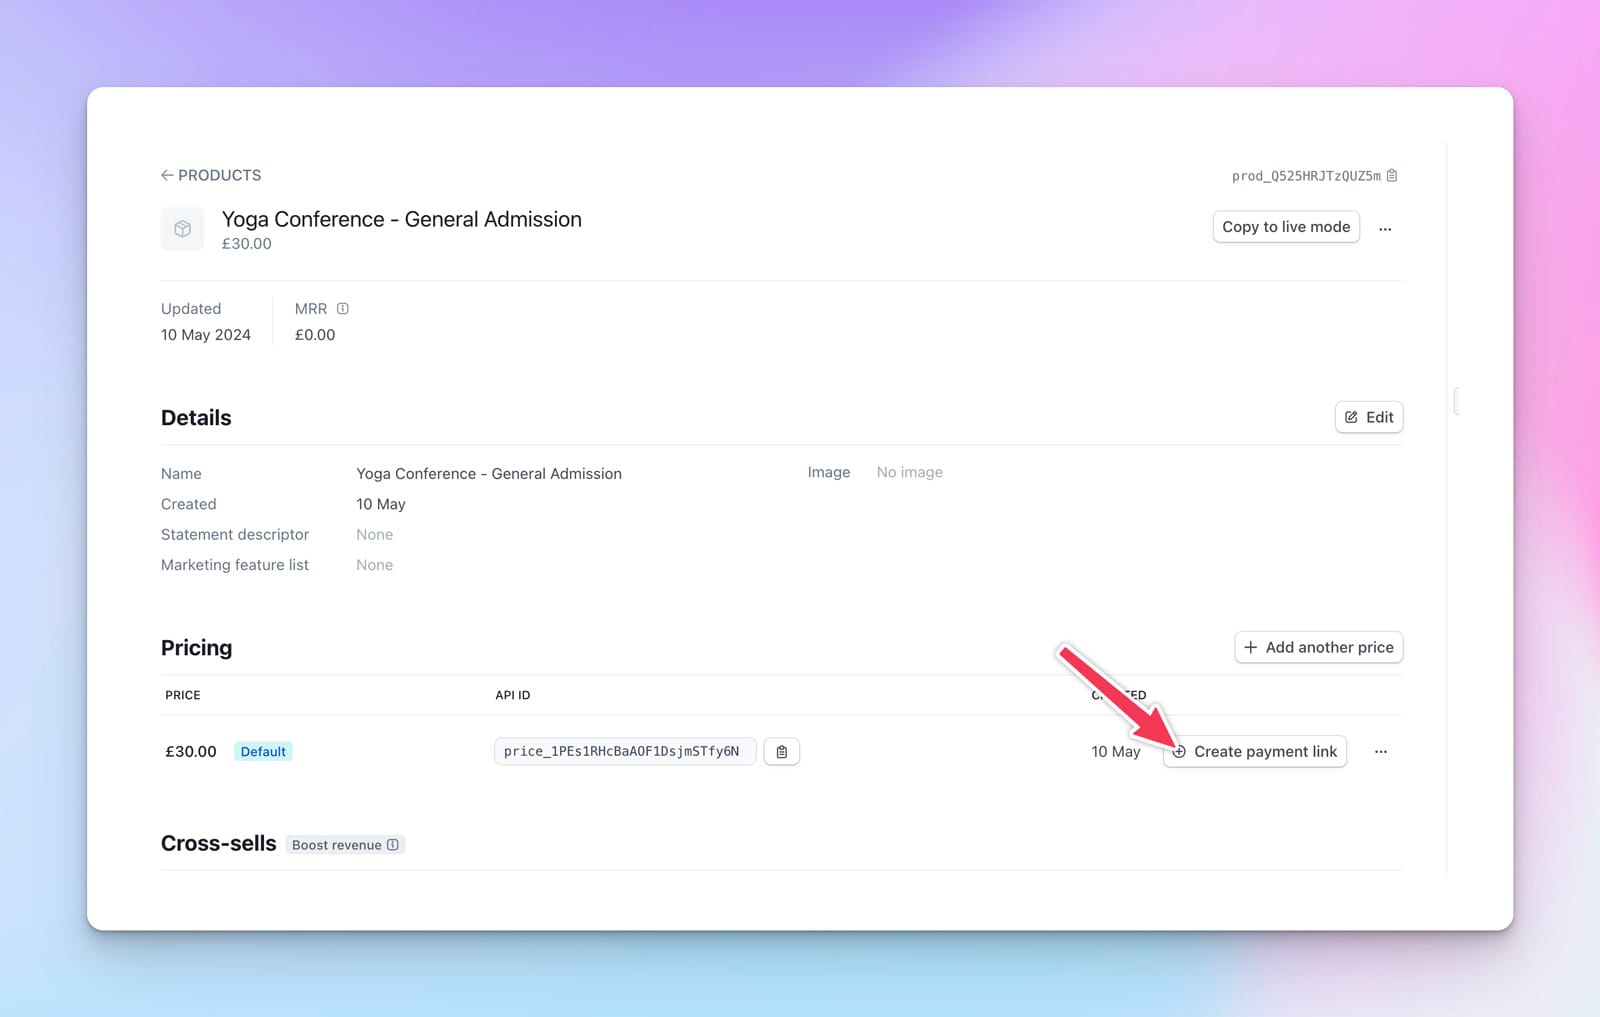
You should now be on the 'Create a payment link' page, which is where things start to get exciting!
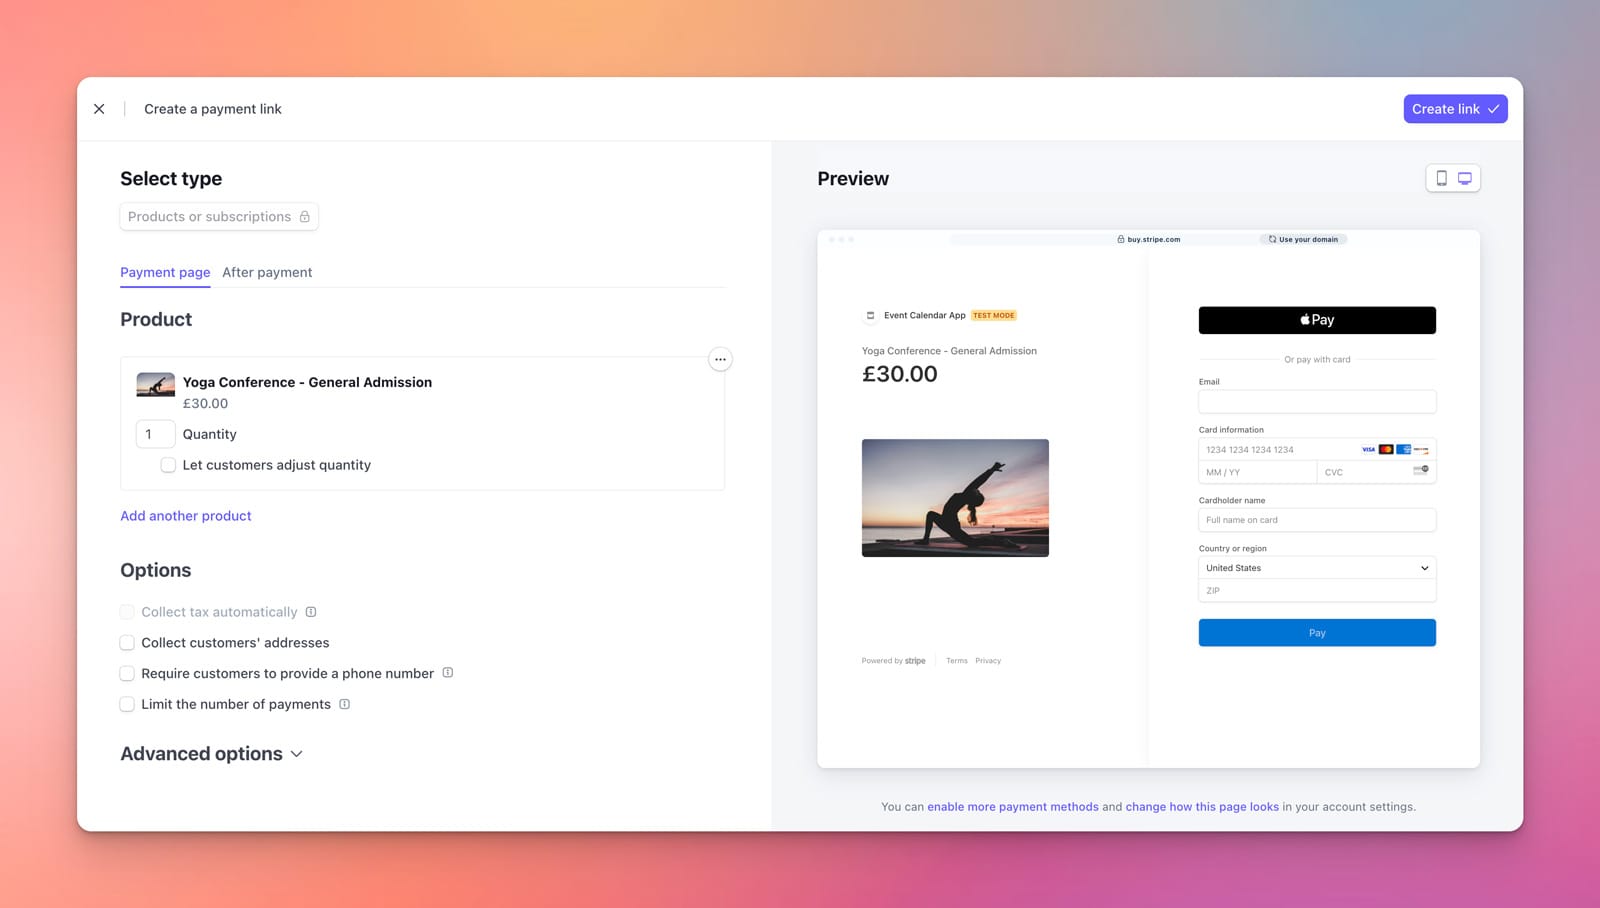
The preview on the right is an exact replica of what your customers will see when they try to buy one of your tickets. Your customers will temporarily leave your website and go to this page. So, it's best to brand it as much as possible to make them feel comfortable.
Notice how on the checkout page we're currently missing the company logo. Let's fix this.
Head to the 'branding' page within Stripe. This enables you to add icons, logos and brand colours to all your payment pages.
Again, this is really important to do because it helps to create trust. Unfortunately Stripe Checkout is a link that takes the user away from your website. Anything we can do to maintain that 'link' between your website and Stripe Checkout is good. It's going to help increase trust and the conversion rate.
After doing this, head back to the product catalogue page. Click your product and click back to 'Create payment link'.
Here's what mine now looks like:
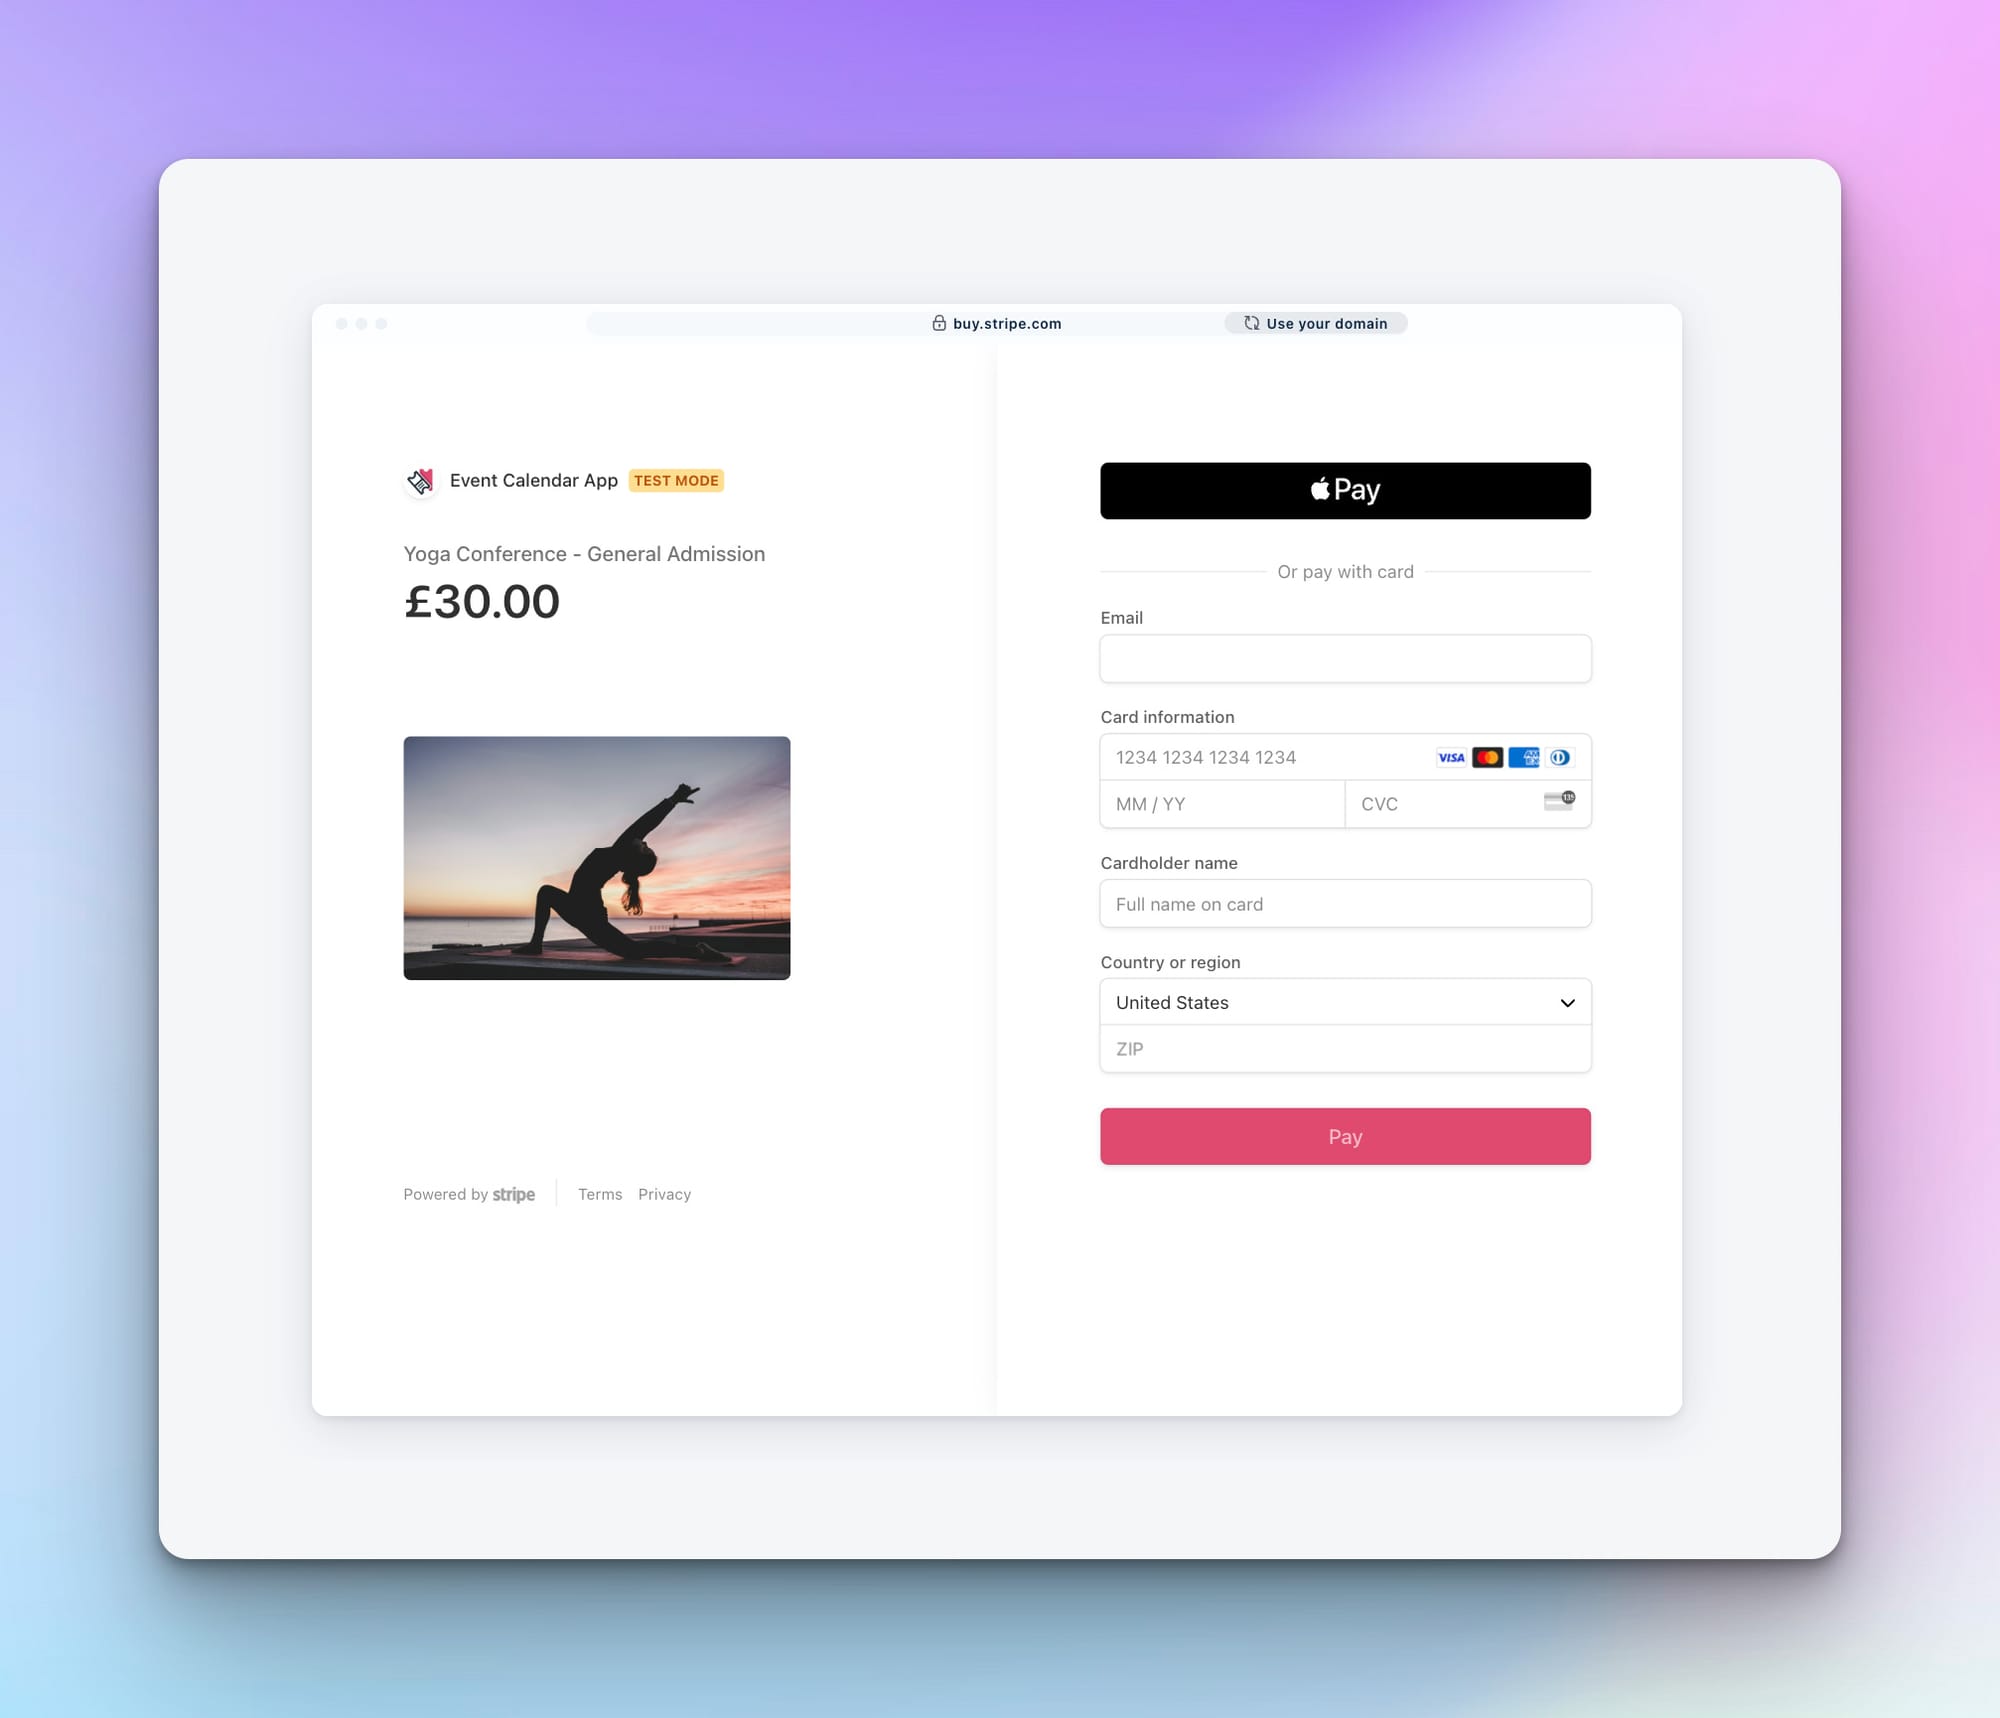
Much better. You've now got your brand colours and logo. Perfect.
Adding custom fields to Stripe Checkout
A nice feature when selling event tickets with Stripe is the ability to add custom fields. This is super useful if you need to collect extra information like dietary requirements, where they heard about you, that kind of thing.
Custom fields is an option hidden under 'Advanced options'.

There's a important point here though. The more questions you ask of your user, the less likely they are to convert. It's proven that customers are more likely to complete smaller and simpler forms. You need to balance this out against the effort of chasing information after they have signed up.
After purchase options
The final thing to set up is what happens once your customer has purchased a ticket. Click the 'After payment' option to configure:
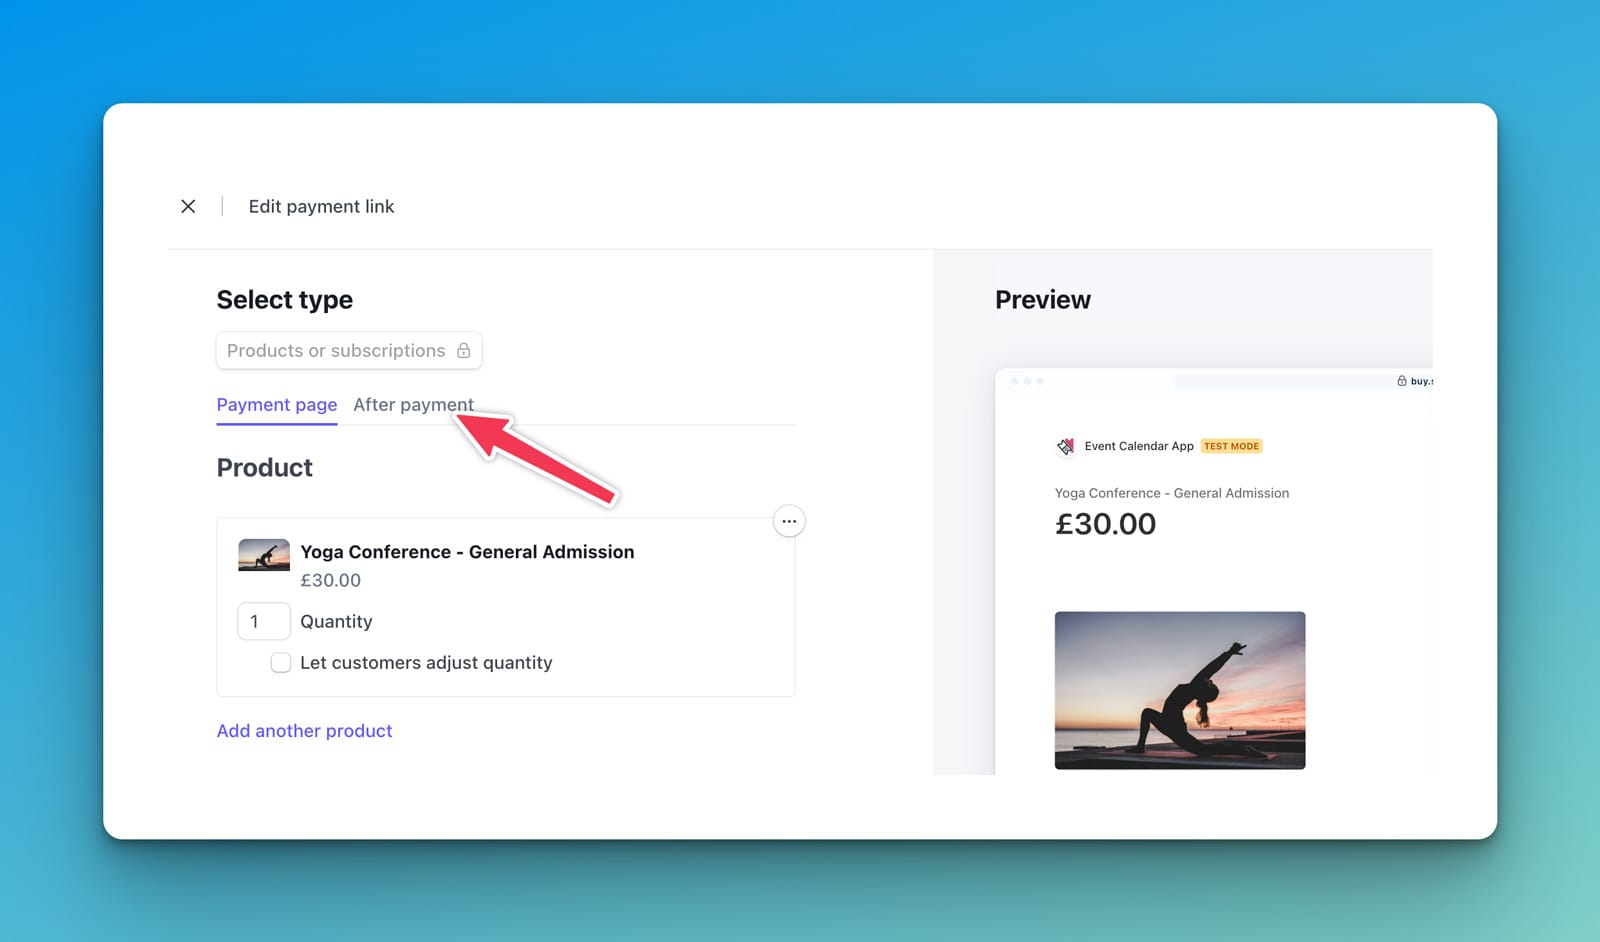
There's two options here:
1. Show a confirmation page
This is the most basic option and is easy to setup. After payment, Stripe will show a success page.
2. Redirect them back to your website
This method is much better, and ideally what you want to do. Just showing a confirmation page is bad as there's a very high chance your customer wont go back to your website. These are your paying customers - don't throw them away at this stage. You could be leaving money on the table here as it's likely they would be willing to buy more from you.
Redirecting them back to your website also allows you to do conversion tracking. If you're using something like Google Analytics this is pretty easy to do.
When redirecting customers back to your website, don't direct them back to your homepage. Create a page, even if very basic, that explains that you have received their payment and will be expecting them at the event.
Finishing up...
Once you're done with the different options, hit the 'Create link' button:
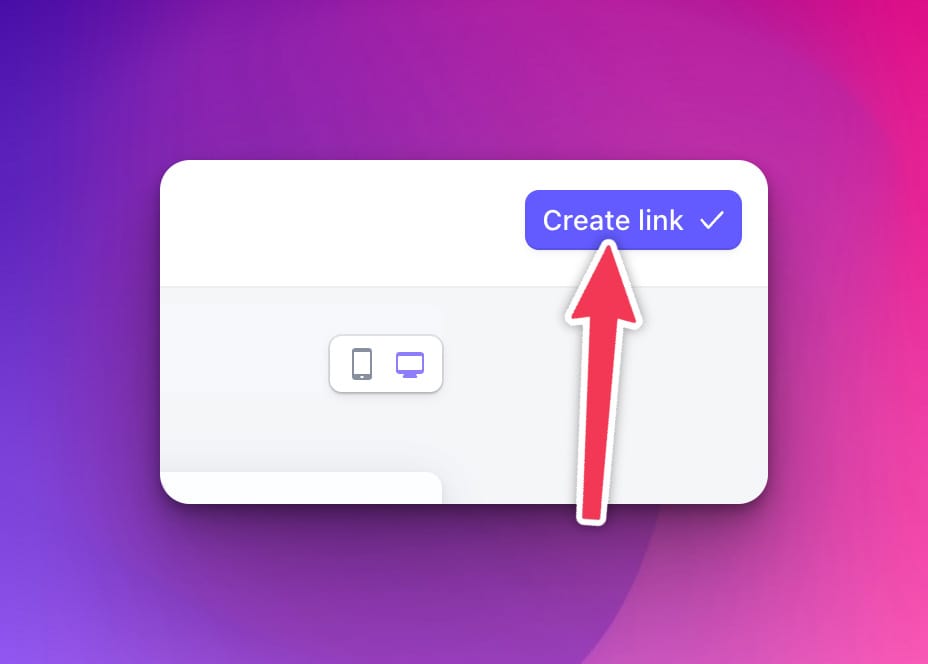
Your payment link has been created and you should now see a page that looks like this:

There's two main methods to let your customers buy tickets:
- Embed Stripe Checkout on your website
This method uses the 'Buy button' option. Unfortunately Stripe Checkout is never truly embedded on your website. In reality it's just a link that links your customers to the Stripe Checkout page. Ideally, as I mentioned before, you'll direct them back to your website once they have completed the purchase.
- Use the link to allow your customers to buy tickets
This is great if you're just sending out a email blast, or if you want to code your own website button that links to the checkout page.
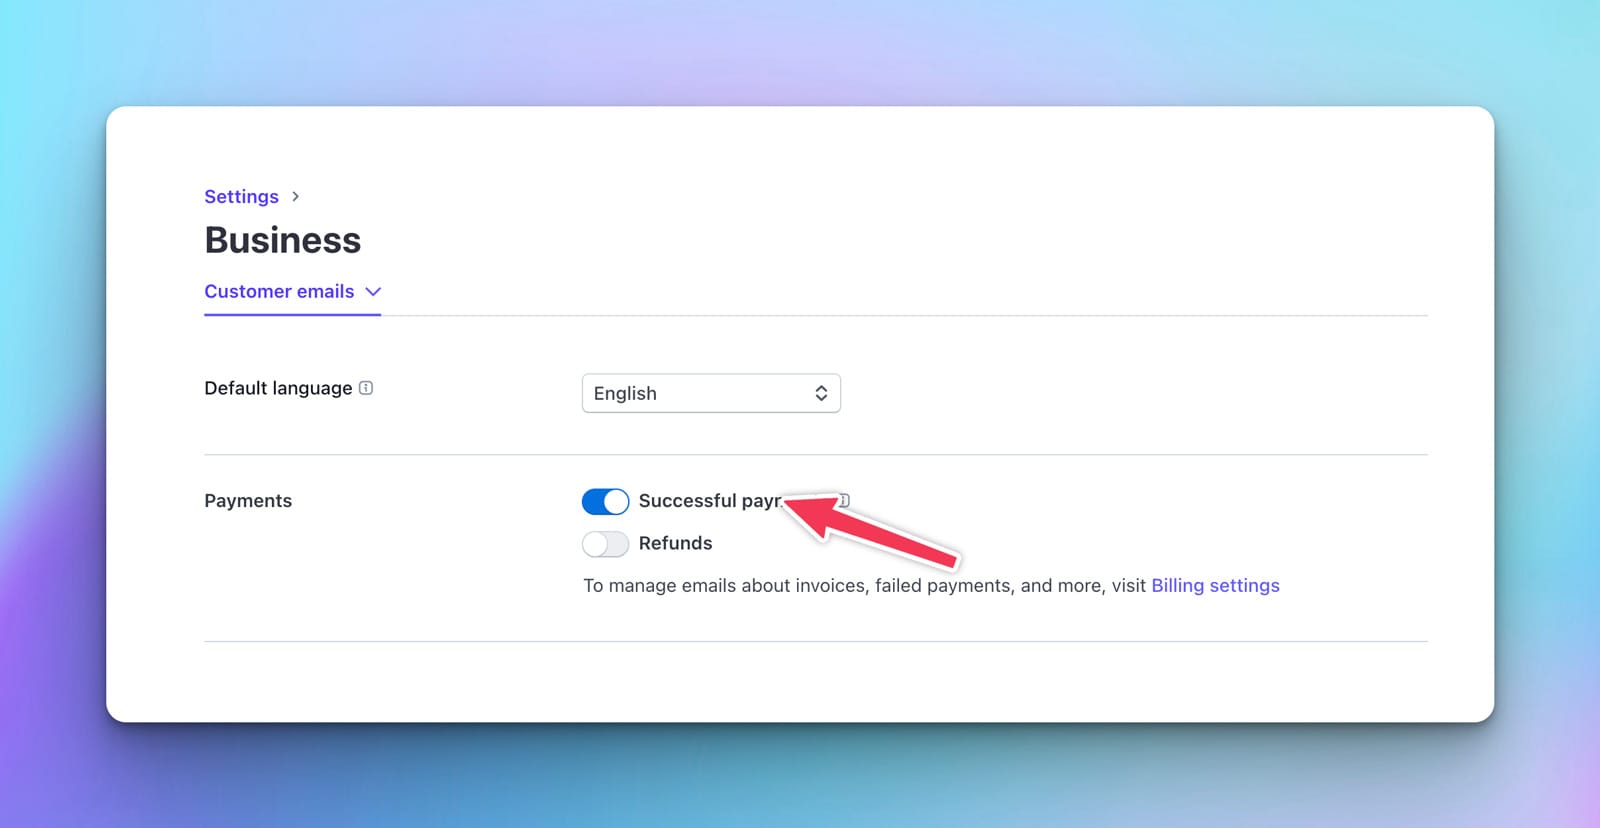
Turn on Stripe confirmation emails
The last thing you're going to want to do when selling tickets with Stripe is turning on confirmation emails. Otherwise, when your customer buys a ticket they're going to have no payment record which is going to cause Mr Customer to be Mr Confused Customer. And no one likes an angry customer!
Head to your customer email settings in Stripe and ensure 'Successful payments' is turned on.
You're all setup.
All that's left to do now, is let your customers know about your event. Using the two methods above, you should be able to add a button to your website (if you have one) and email a link out to potential attendees.
The attendee purchasing experience
So what happens once someone purchases a ticket I hear you say? Great question!
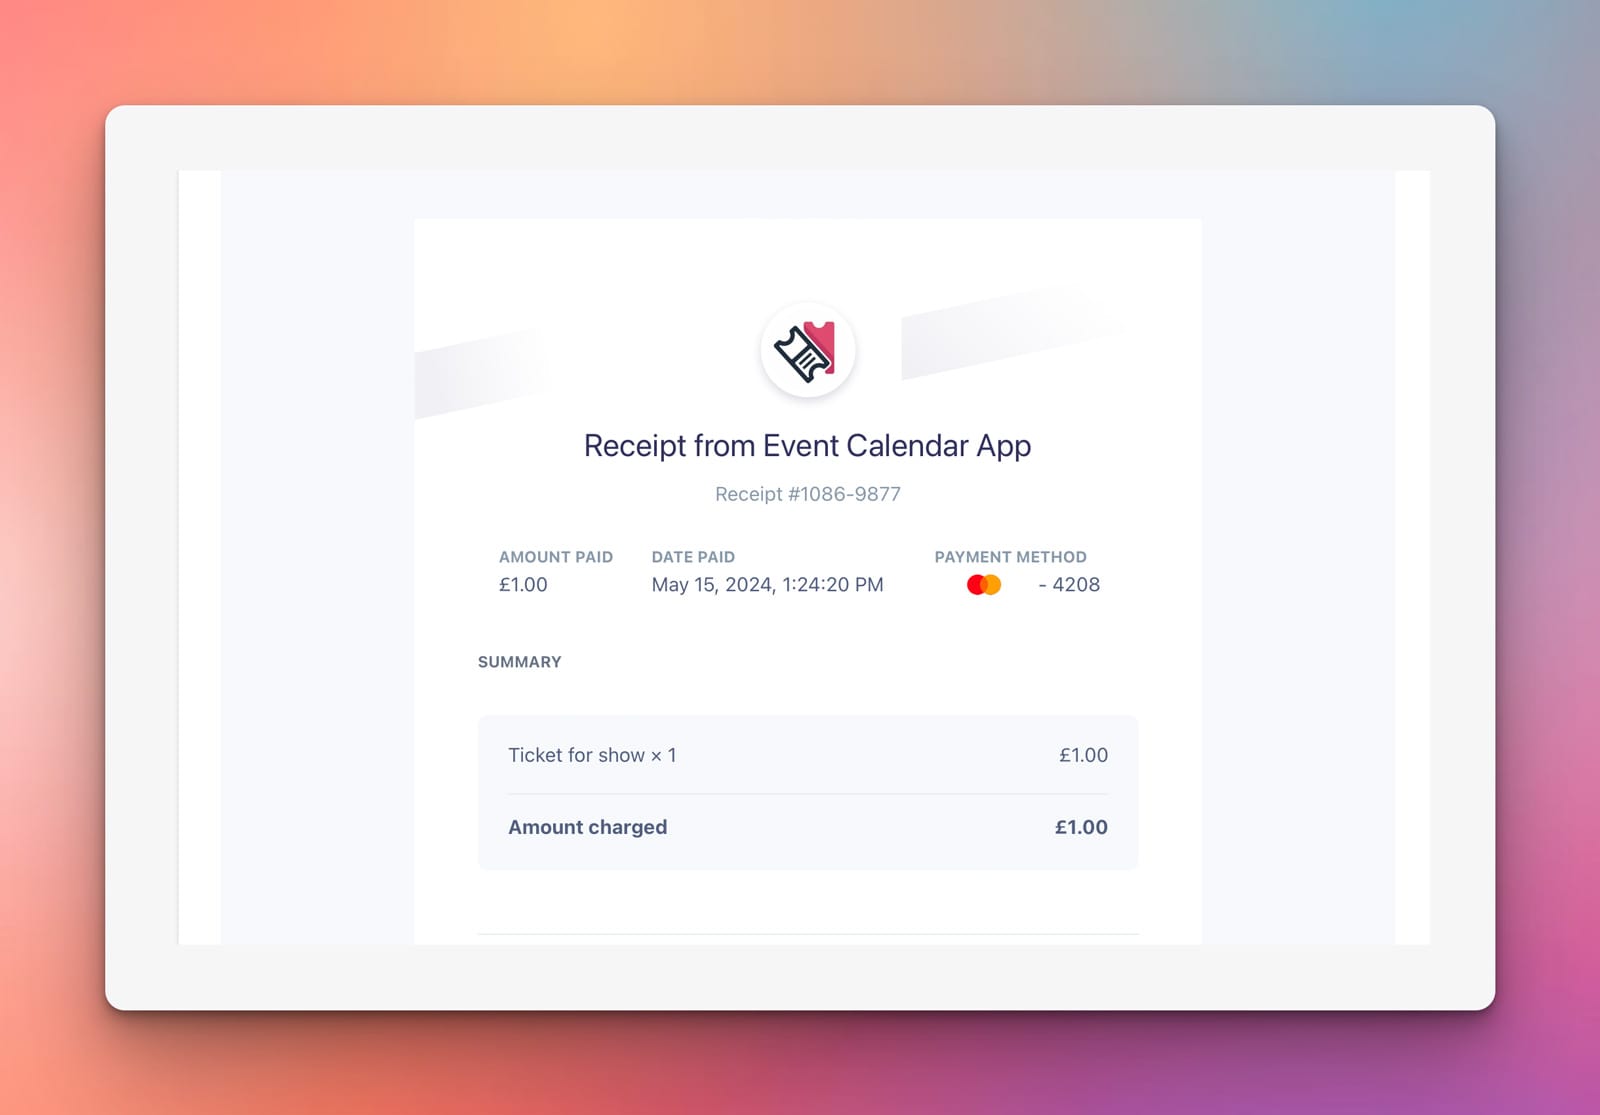
Do customers receive a confirmation email?
Yep. It's basic but at least your customers have a record of the purchase. It looks something like this:
How can I see who's coming to my event?
This is a little convoluted, but bare with me. Head to your 'Product catalogue' page, click on the 'product'. Then click 'View payment link'.
The click 'Payments and analytics'. It looks like this:
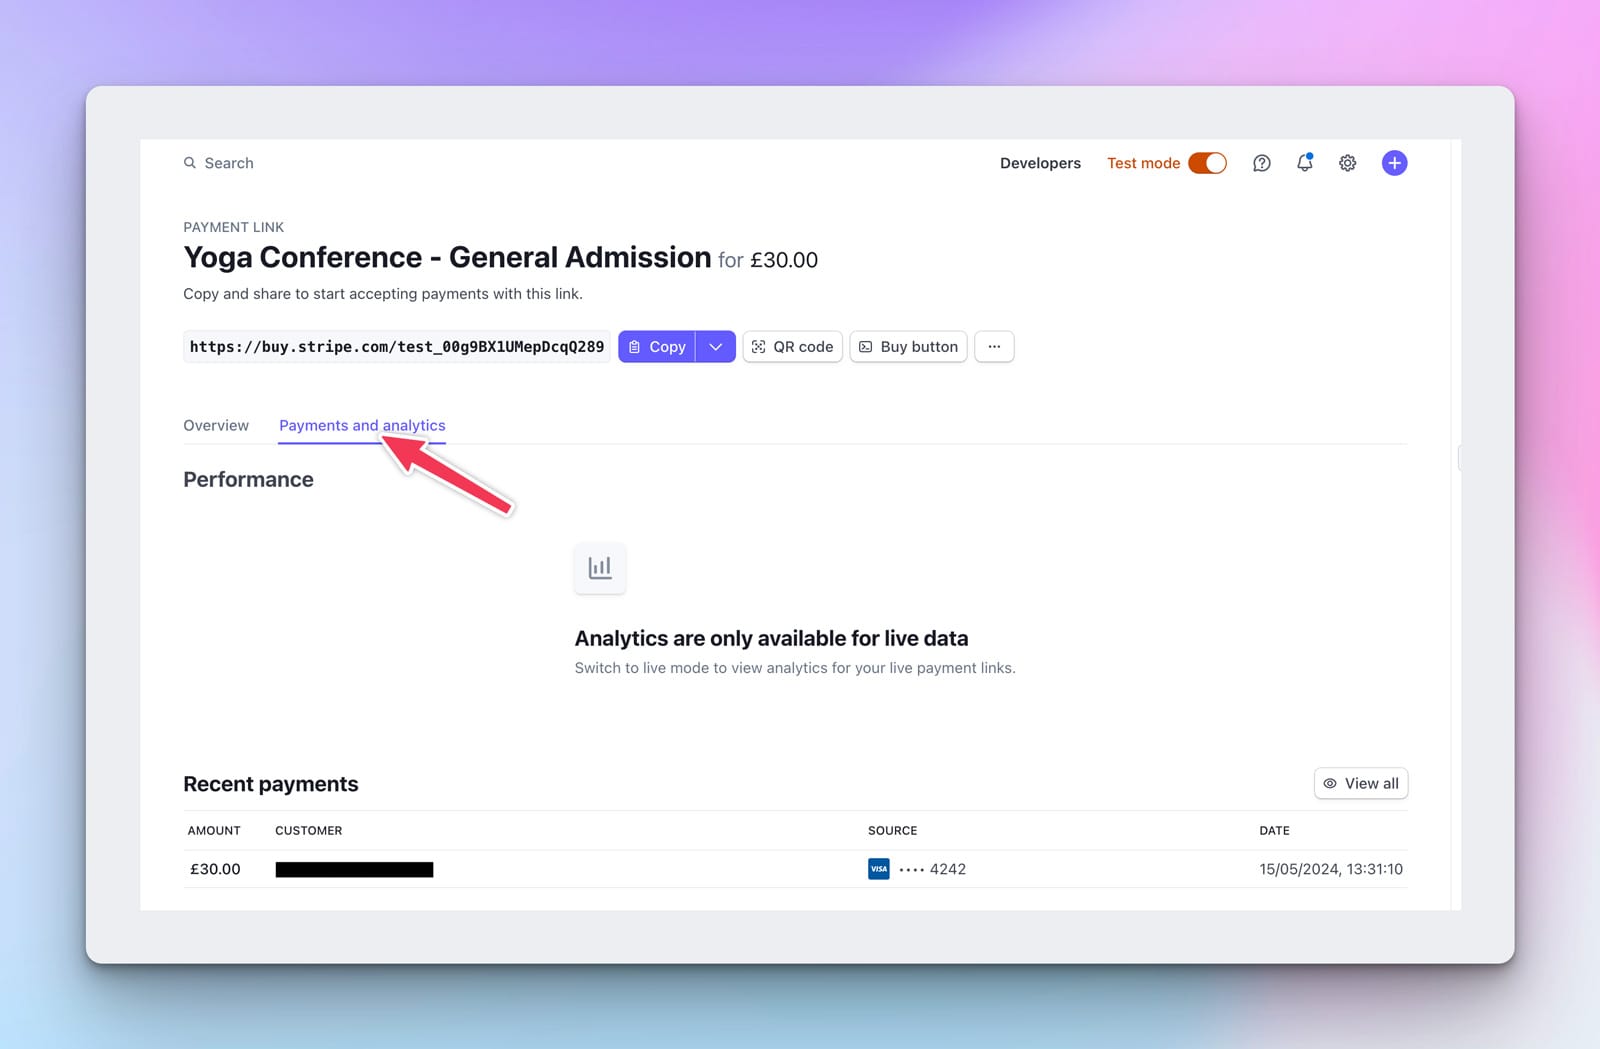
Under 'Recent payments', this will give you a list of all the payments in relation to this product. Or in other words, all the attendees to your event! You can click into each one to see more details and answers to any 'custom fields' that may have been asked.
What about if I want to sell multiple ticket types?
Good question...
What about if I want to send event email reminders?
Also a good question...
What if I don't want to send people away from my website?
...
Ok, this Stripe Checkout solution is basic I agree. It's not really made for selling tickets to events, but it does work if your needs are pretty basic.
If you're looking for something a bit next level, you might be interested in a tool I made called Event Calendar App. It fills in all the gaps that using just Stripe is missing out on here - and more. Cool stuff like:
- A embedded Event Calendar on your website to display all your events. It's pretty sweet, and looks like this. It goes straight on your website:

- No sending your precious customers off somewhere else. Registration happens on your website.

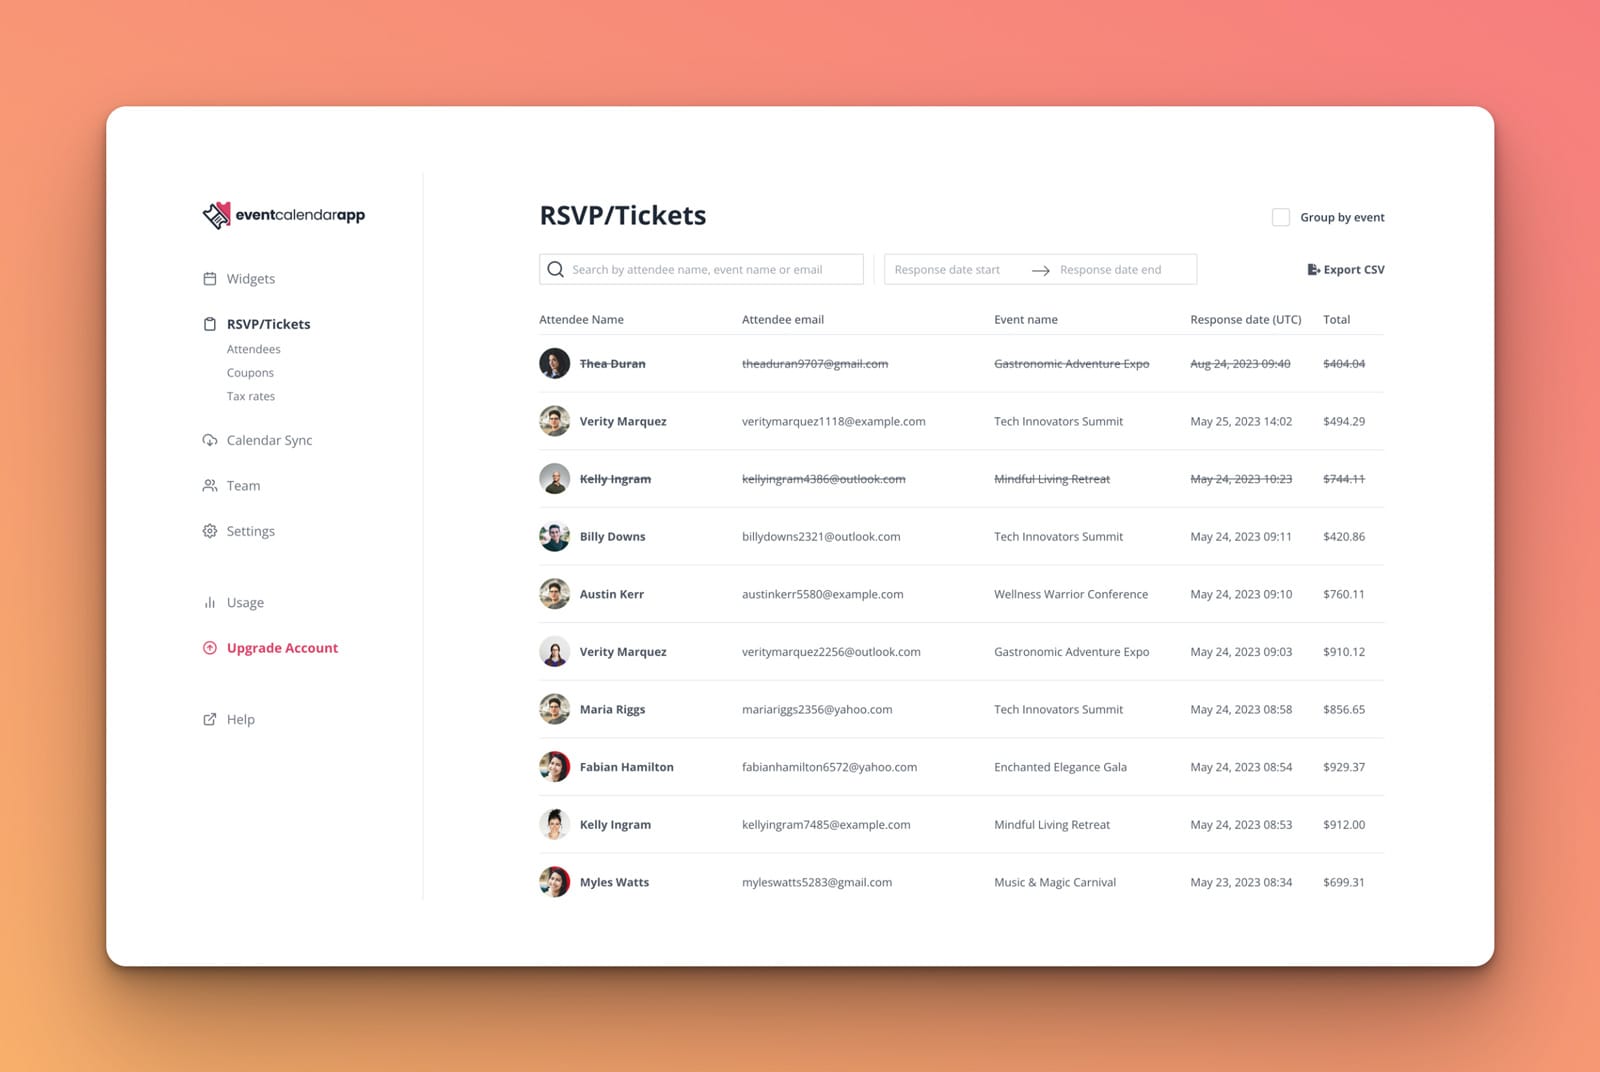
- A beautiful, easy to use interface for seeing all your attendees:
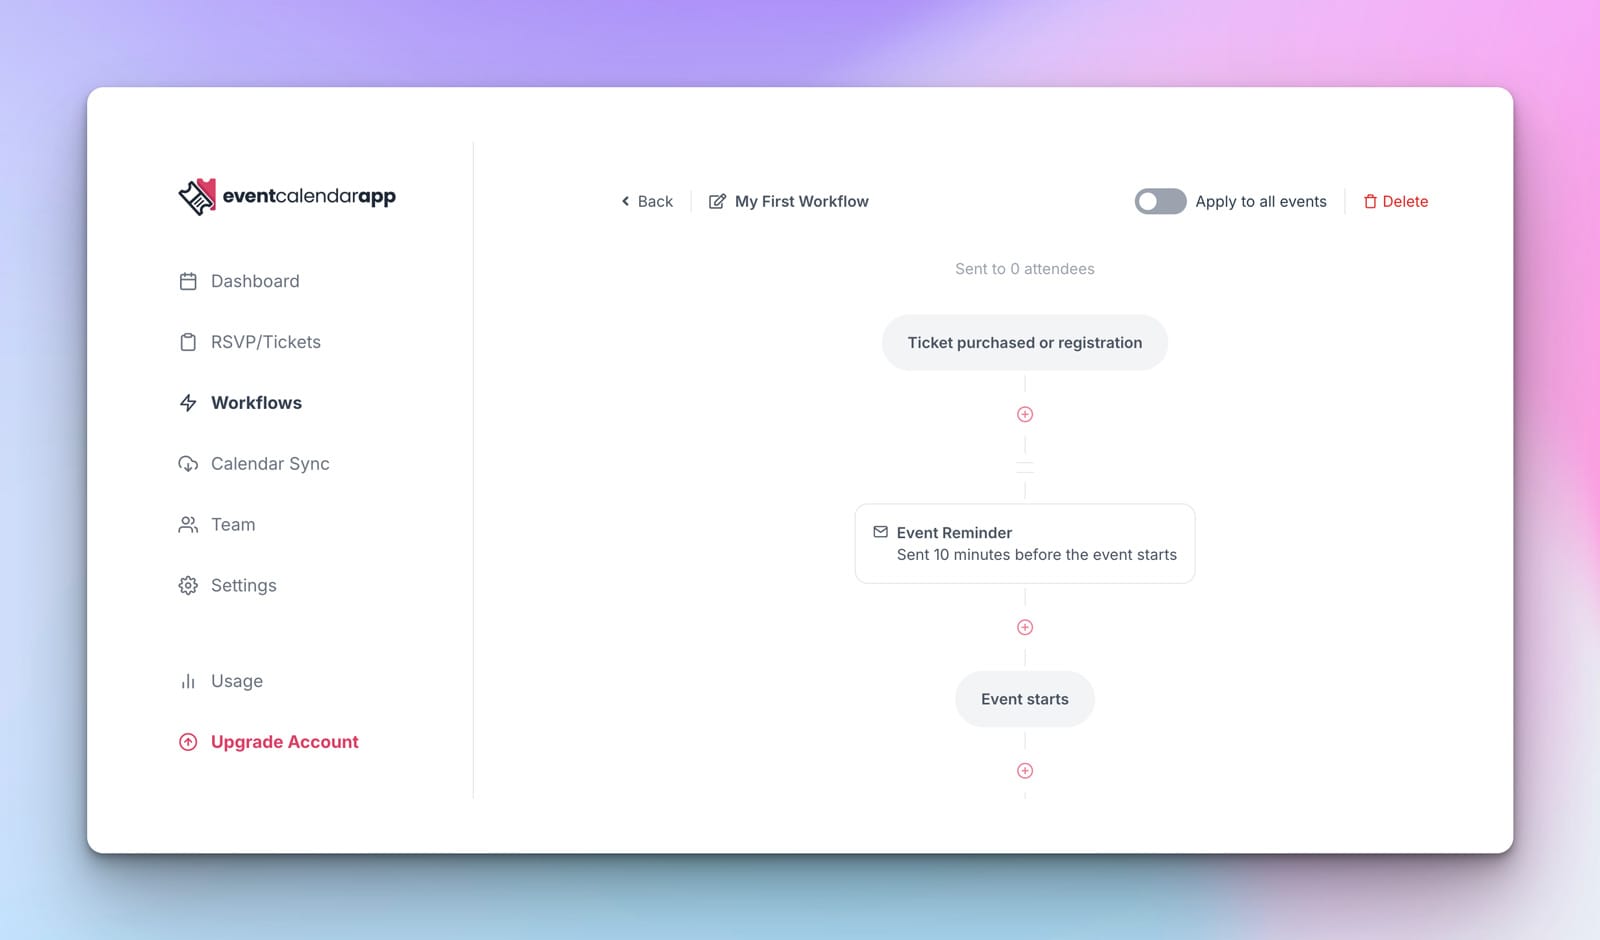
- And a 'workflow' builder, so you can send automatic email reminders, pre-event instructions, post event surveys, that kind of thing.
Oh, and it all uses Stripe in the background still. So we're able to pass on those delicious low fees.

Written by Alex Perry
Hey 👋, I’m Alex, founder of Event Calendar App. I’ve been helping event organisers for nearly 10 years with events, classes, courses and workshops. Here's what I've learnt that might help you too.
